Adobe XD prototyping
Tutorial 1:
In this practical exercise, I’ve explored the basics of prototyping in Adobe XD. Prototyping is essentially what makes webpages and apps function, there are variety of ways prototyping is implemented within web design due to the number of components featured throughout web design. Web designers have a lot of freedom when it comes to prototyping as they are essentially in control by setting the tone of the web’s functionality. As well as being a key role in UI, prototyping side of web design falls massively under UX as prototyping plays a huge role in users experience as they explore the web through functionality point of view.
For these exercises I used this basic template consisting of components. Firstly, I’ve implemented some background styling to enhance the visual creativity and the UI, the simplicity in Adobe XD is that you can implement an effective design style through simple use of shapes which is what I’ve done here by simply experimenting with shape and composition. As you can see I tried creating a similar background styling to the tutorial example by adding a circular shape but creating a vertical semi-circle effect on the left hand side of the artboard. As I dragged the circle from the shape tool, I changed it’s colour using the eye drop tool to match the colour of the tutorial example artboard. I’ve also ensured to move the background shape layer below other layers so that the relevant information is clearly visible. This simple design approach is easy to learn and very effective at the same time as it doesn’t require a lot of time to implement effective design components made up of shapes.
Next approach was adding some content, when doing so it’s useful to have my relevant components grouped as it makes it easier to implement the same group of components in my other artboards
Once, I’ve had my content in place I was then introduced to the basics of interactivity through prototyping. I needed to link one of the icon components to another artboard which I’ve achieved through basic prototyping, in my XD file as I headed over to the ‘prototype’ mode which highlights my first artboard with the icon elements. This indicates my selected artboard allowing me to add functionality to my components. I’ve achieved this by simply clicking and attaching the wire in prototype to the other artboard. More specifically, it is important to prototype the relevant components that link to each other, therefore I’ve double clicked on the top icon and linked it to the appropriate artboard that talks about that specific topic. Furthermore, I’ve added a prototype functionality to the return icon so that I can go back to the previous page.
I also have the option to determine how the components are triggered to function, I set it to ‘tap’ as that is the most convenient option.
Tutorial 2
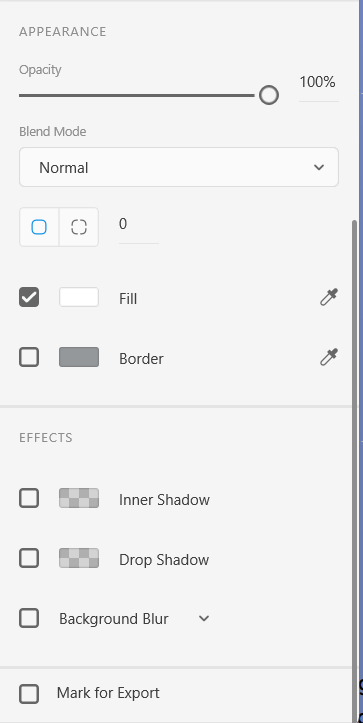
This tutorial mainly focuses on the basics on implementing images and prototype functionality of web app. To implement images in XD I simple drag and drop them on my artboard which can be easily resized. On the right-hand side, you can make visual changes to your components such as the opacity, colour and shadow. I then implemented interactivity linking the ‘latest adventures’ component to it’s information page on a separate artboard.
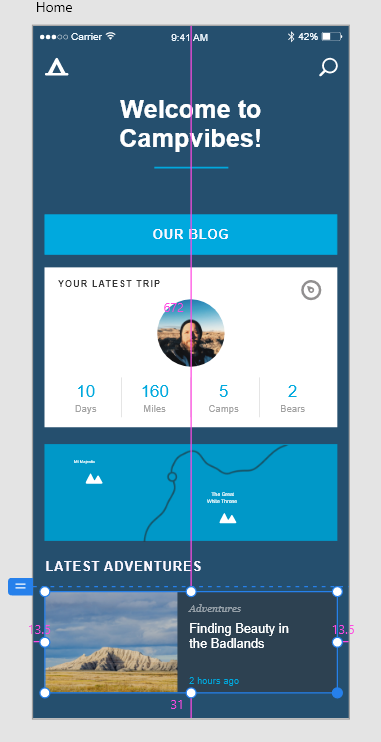
Finally, I’ve added multiple functionality elements at once as each icon is linked to another artboard. At the same time, I’ve implemented prototype that allows us to return to the previous page by simply linking the ‘return arrow’ icon back to the original artboard.
I then implemented a list of components allowing me to group them together, I then went on to click the rectangle in the blog artboard and selected ‘repeat grid’ which allows me to reveal my grouped components as I drag down the grid.
I then made the page scroll, I’ve used the blue dotted line to determine where the page starts to scroll from which I’ve placed just in between the four images. Before previewing, I’ve ensured header is in a fixed position so that the scroll feature only effects the grouped ‘adventure posts’ components.
I then explored the basics of implementing colour in Adobe XD, I can change the colour of components in different ways. I can simply select the component and select the colour through the colour panel, however if I want a specific colour that I already exists on my artboards I can simply use the eye drop tool, hovering over the colour I want and selecting it which then automatically changes the colour of my component. This is what I’ve done in my tutorial changing one of the components from blue to green. Another way to add specific colour to a component is by adding colour to asset which makes that specific colour appear automatically in the colour asset.